The most important goal for good educators is to improve their teaching skills, and maximize student engagement and learning. However, it can be difficult to do this when teaching dozens of students at a time.
That’s where microteaching comes in.
Microteaching enables teachers to experiment with different teaching methods and take the necessary steps to upskill. This process works conjointly with the use of a well-designed microteaching lesson plan that keeps the teacher focused on the lesson and the points they’re trying to pass across to students.

Read on to find out what microteaching is, the necessary microteaching skills teachers should have, and how to create an effective microteaching lesson plan.
Skip ahead:
- What is microteaching?
- Examples of microteaching styles
- What is a microteaching lesson plan?
- How to write a microteaching lesson plan
- 8 microteaching skills that teachers should have
- Improve your teaching skills with microteaching
What is microteaching?
Microteaching is a teaching technique where a teacher conducts a class for a small group of students at a given time. This approach allows the teacher to focus on honing a specific teaching skill/technique, identify areas where they need to improve, and receive feedback on their performance in real-time. It also allows teachers to demonstrate the depth of their knowledge and understanding of the subject matter in a low-stress environment.
Unlike regular lessons, microteaching sessions usually last between 15 and 30 minutes. During the lesson, the teacher presents a specific topic and uses different teaching methods, such as demonstrations, peer group discussions, and even simulations, to explain the topic. The teacher may also use audiovisual aids to illustrate key points. Most microteaching sessions have a class instructor or supervisor who gives feedback to the teacher on the clarity of their presentation and the effectiveness of their teaching style.
Microteaching can be valuable to teachers at all stages of their careers — from teachers who are new to the profession to experienced teachers who want to improve their skills or learn new teaching styles.
Examples of microteaching styles
If you want to host a microteaching session, here are some styles you could use:
Mini-lessons are the most popular form of microteaching. It involves presenting a brief, focused lesson on a specific topic or skill to a small group of students — it could even be just one student. This method allows you to practice your delivery skills and assess how well the student(s) understood the topic based on the presentation. You can also ask each individual student as well as the class supervisor (if there’s one) for feedback on the lesson.
This method is exactly what the name implies — a lesson delivered in just 60 seconds. One-minute lessons are usually used as a way to train educators on how to plan and deliver a value-packed lesson in a dynamic and high-pressure environment.
To use this method, you’ll select a sub-topic of a specific subject that you can explain in a short amount of time. This could be explaining a new concept or demonstrating a particular technique. Then, you need to pool together resources such as diagrams, illustrations, charts, and graphs that can help you deliver information in a clear and concise manner.
There are certain topics or skills that students may understand better if they get actively involved, such as acting out a play. If you’re trying to explain a topic like this to students should try getting the students to assume different roles that are integral to the lesson.
This gives you a way to interact with the students and practice your delivery skills. It also allows the students to assimilate information better because they’re an active part of the lesson — as opposed to being passive listeners.
A great way that you can get your students involved in your lessons is to give them an immersive experience through virtual reality (VR).
With VR headsets, you can transport your students to a simulated scenario where they can interact virtually with the components of the lesson. As students operate in the virtual space, you can explain these lesson components to them and respond to their questions.
Simulation is a great way to teach students skills that are dangerous or require expensive equipment that you don’t have access to at the time. You can also use this method to teach history and take your students to different countries (and even show them what these countries looked like centuries ago) without ever having to go there physically.
This microteaching method involves using real or fictional case studies to teach a lesson. It is commonly used in teacher training and development programs to give teachers the chance to show their ability to apply hypothetical and theoretical concepts and ideas to real-life situations.
If you decide to take this approach, you may ask your students to analyze a case study and discuss possible approaches or solutions to a problem. You can also use case studies to explore important notions and hypotheses.
Video recordings can be used in two ways: when there are no students available or when the teacher is conducting lessons for e-learners. In the case where there are no students available, you may present a lesson in an empty classroom while being recorded on video.
When you’re done, the class supervisor can review the video and offer feedback about your performance, including the quality of your lesson material, the pacing, your tone of voice, and your body language. This way, you can hone your delivery and presentation skills, as well as your ability to craft concise, yet explanatory, lesson materials.
If you’re conducting lessons for e-learners, you can share the video with them and ask them for feedback on your teaching style.
What is a microteaching lesson plan?
A microteaching lesson plan is simply a smaller version of a regular (or macro) lesson plan. It includes all the same elements you can find in a regular lesson plan, but on a much smaller scale.
Read more: Best Microlearning Platforms of 2023
Unlike macro lesson plans that encompass an entire semester or academic year, micro lesson plans contain information on the specific lesson or subject the teacher plans to present on a given day. This means that teachers draw up individual micro lesson plans every day that focuses on brief subjects or topics that students can understand quickly.
How to write a microteaching lesson plan
Writing a micro lesson plan is very similar to writing a regular lesson plan. But to make the process easier, you may benefit from following certain frameworks.
Below’s a 5-step framework for writing a microteaching lesson plan.
Before planning your lesson, you need to stipulate everything you want your students to know by the end of your presentation. These learning objectives should be written in a clear and concise manner that students can easily understand.
For example, Dr. Angela Yu has a web development bootcamp course on Udemy. On the sales page of the course, Dr. Yu clearly explains the learning objectives for the course.
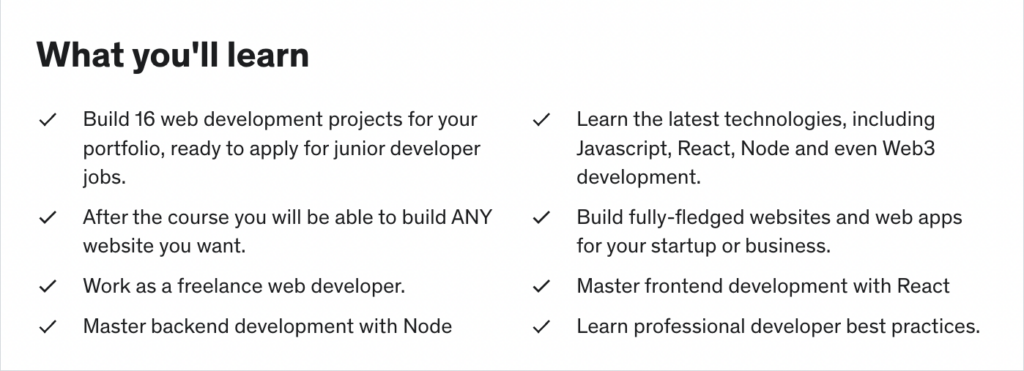

This gives potential students an idea of what they’ll be able to do by the time they finish the course.
When mapping out your microteaching lesson plan, you should consider the specific learning activities your students will engage in to develop the skills required to demonstrate an adequate understanding of the lesson/course. These activities should relate to the learning objectives of your lesson, and enable students to practice and receive feedback on their progress.
For example, if you’re a literature teacher that wants to explain the nuances and motivations of the characters in Williams Shakespeare’s Othello, you could have your students assume the roles of these characters and act out the play in class. Since they’re stepping into different roles, your students will be more likely to explain the reasons for their characters’ actions through their own unique perspectives.
As you map out your specific learning activities, indicate how much time you will spend on each. Also factor in some time for explanation or class discussions. Keep in mind that you’ll need to cover the topic in 30 minutes (maximum) so be careful not to assign too much time to each activity.
As you design the learning activities, ask yourself:
- What can I do to explain the topic?
- How can I get my students actively involved in this lesson?
- What are some relevant analogies, examples, and situations that can help my students understand the topic?
- What can my students do to better assimilate the topic?
Examples of learning activities that students can engage in include:
- Plays
- Debates
- Discussions
- Games
- Simulations
- Concept mapping
- Reflection journals
- Quizzes
- Drills and practice
- Real-world projects
At the end of your lesson, you’ll need to give your students tests, assignments, and problems that will determine just how well they understood the topic. These methods of assessment give students the opportunity to demonstrate the knowledge and skills they learned during the lesson and get feedback from their teacher.
Planning for assessment involves making decisions about:
- the type(s) and number of assessment tasks that will enable your students to demonstrate that they’ve achieved the learning objectives for the lesson
- the criteria with which you’ll make an assessment (e.g. rubrics)
- whether students will be involved in the assessment process or not (e.g. peer assessment)
- the method by which the results of individual tasks will be combined into a final/overall grade
- how you’ll provide feedback to your students
It is helpful to draw up a timeline of the sequence of your lessons. This allows you to keep to time and present your lesson in a smooth and engaging manner.
In 1965, Robert Gagne, a prominent American educational psychologist proposed what he called the events of instruction, which is a nine-step framework for presenting a lesson or course.
- Gain students’ attention: At the beginning of your presentation, you’ll need to present a scenario or stimulus to gain your students’ attention. You could:
- Ask thought-provoking questions to students
- Tell a story or present a problem to be solved
- Use icebreaker activities, case studies, current news, events, etc. to introduce the topic
- Inform students of learning objectives: Here, you’ll break down the learning objectives of the lesson. This gives them a good understanding of what they’re expected to learn and do during and after the lesson. Here are some ways you can do that:
- Outline your learning objectives in the syllabus, presentation slides, and in instructions for papers and projects
- Describe the performance you require from your students
- Describe the criteria for peak performance
- Prior learning: If your lesson is a continuation of a previous lesson or if it’s related to something that your students have learned about in the past, connect the dots. When students recall prior learning, they’ll be able to make better sense of the new information you’ll impart. Here are different ways to recall previous topics:
- Ask students questions about their understanding of previous concepts
- Relate previous course information to the topic you’re presenting
- Give students the opportunity to incorporate ideas from prior learning into the current lesson
- Present the content: The next step is to present the topic in its entirety. The key to doing this effectively is to organize content in a meaningful way, offer demonstrations, and explain new concepts and ideas. Here are some ways to present the lesson content:
- Use different media to present the same content (e.g. physical lecture, video, illustration, demonstration, podcast, group work, reading, etc.)
- Use a blackboard to give students access to lesson content outside the class
- Use active learning strategies to keep your students engaged
- Provide learning guidance: To ensure that your students understand your topic, inform them of additional content and resources they can use to learn more. Here are some methods you can use:
- Support your students by giving them cues, hints, and prompts that can be removed as the student learns the task
- Use different learning strategies to help students memorize information (e.g. role-playing, mnemonics, visualizing, concept mapping, etc.)
- Use analogies, case studies, and metaphors to provide real-world applications and help students connect with new concepts
- Practice: The next step is to have your students apply what they learned to confirm that they correctly understand the topic. Here are a few methods to use:
- Give students assessment opportunities (e.g. individual or group projects, written assignments, presentations, etc.)
- Design quizzes and tests for students
- Provide feedback: Once your students turn in their projects and assignments, give them feedback on how they performed. Also give suggestions on how they can improve their performance. Consider implementing self-evaluation and peer feedback to help students identify learning gaps and low performance in their own — and their peers’ — work.
- Assess performance: To gauge how effective your lesson has been, give your students tests and exams. This way, you’ll be able to check for the progression of competency in knowledge and skills. Don’t forget to use different assessment methods to do this, including quizzes, oral questioning, rubrics, and projects.
- Enhance retention and transfer: The final step is to help learners internalize new knowledge by giving them more opportunities to apply course concepts to real-world situations.
When you put Gagne’s events of instructions into play, be sure to consider how much time you have to present the class. Here are some time management strategies you can employ:
- Estimate how much time each step will take and then add some extra time for it
- In your lesson plan, indicate how much time each class activity will take
- Make some extra time at the end of the class to sum up key points and answer students’ questions
- Plan an extra activity or learning question in case you have more time left at the end of the class
- Make your timeline flexible enough for you to adjust your lesson plan to students’ needs
When you’re done presenting your lesson, you’ll need to close it. There are a few ways you can close a lesson. Here are some of them:
- Emphasize key information
- Correct students’ mistakes
- Preview future topics
- Ask a student to summarize the lesson
Lesson closure helps students internalize important information, link lesson ideas to other concepts, and transfer ideas to new situations.
8 microteaching skills that teachers should have
Microteaching can only be successful when the teacher has the necessary teaching skills that facilitate learning. Since Dwight W. Allen developed microteaching in 1961, nearly 40 teaching skills have been identified. But here are the eight most important ones:
Introduction
The typical attention span of a student for a 60-minute class is 10-15 minutes. So if you’re going to keep the attention of your students, you’ll need to know how to introduce your topic in a way that will interest them.
Stories, analogies, hard-hitting facts, and deep questions are great ways to introduce a topic and get students hooked from the jump. Because of time, try not to make your introduction verbose or disjointed.
Explanation
When you get to the main part of the lesson, you’ll have to rely on your ability to break down complex concepts in a way that’s easily digestible for your students. This involves speaking with clarity, using examples to depict the relationships between different ideas, and crafting strong concluding statements that summarize the key points in the lesson.
Questioning
During and after a lesson, you’ll want to occasionally check in with your students to ensure that they’re correctly assimilating the information you’re passing across to them. The best way to do this is by asking them questions. For the questions to be effective, however, they have to be clear, meaningful, precise, relevant, and specific.
Questions that meet these criteria can help you gauge your students’ knowledge and determine if they have an adequate understanding of the topic.
Stimulus variation
In teaching, stimulus variation refers to the periodic changing of instructional elements and styles to keep students attentive and maintain their motivation. Since stimulus, according to science, incites a functional reaction in an organ or tissue, changing them occasionally activates students’ brains and keeps them alert.
Stimulation variation skills, in education, include:
- Change in speech pattern
- Change in interaction style
- Change in movement
- Change in gestures
- Oral-visual switching
- Pausing
Positive reinforcement
This involves using words or gestures to positively influence your students’ behavior and encourage them to participate in class. These reinforcers let your students know that you care about how much they enjoy and understand your lessons.
You can positively reinforce your lessons by responding to correct answers with a smile, praising a good student, and encouraging a slow learner. This approach yields much better results than scolding or punishing students, or making insulting/sarcastic remarks.
Illustration
When an explanation doesn’t work or isn’t enough to help students understand a topic, you’ll need to integrate illustrations into the lesson. Through interesting illustrations — diagrams, images, cartoons, graphs, flow charts, and more — you can help your students visualize concepts and grasp them better. You can also use examples and non-examples to illustrate a topic for better understanding.
Blackboard writing
If you’re microteaching in a traditional classroom setting, you may use a blackboard to write some notes, draw diagrams, and solve problems/calculations during a lesson. This grabs students’ attention, and highlights important concepts and terms.
If you decide to use blackboards in your class, ensure that your writing is clear and legible. There should be enough spacing between the letters, and an obvious distinction between words and sentences.
Closure
Just like you need to know how to introduce a topic to your students, you also need to know how to close the lesson. This can be a bit more tricky than introducing because you have to be sure that your students understand everything you’ve explained to them.
To close your class successfully, you can ask a student(s) to give you a recap of the lesson or you can give them assignments to do. This gives you a clear of whether or not your students understand the topic and are able to apply it in the real world.
Improve your teaching skills with microteaching
Microteaching is an invaluable teaching technique for newbies and experienced teachers alike, as it provides an avenue for them to practice and learn new teaching skills without the pressure that a full class brings.
In addition, teachers are able to receive constructive feedback from both students and class instructors. This way, they can improve their skills, increase their confidence and achieve their teaching-learning goals.
New to the world of microlearning? Check out our post explaining it here.
Ready to start creating on mobile? Check out Thinkific’s mobile app builder here!