
Discover the top product tour best practices to enhance user engagement and provide a seamless onboarding experience. Learn from real-world examples and expert tips.
Skip Ahead:
-
All you need to know about product tours
- Key elements of an effective product tour
- Step-by-step guide to creating a product tour
- Checklist for product tour design
- Real-world examples of successful product tours
- Measuring the success of your product tour
- Common mistakes to avoid
- FAQs
All you need to know about product tours
You know your product has the potential to transform the way people learn online. But the key to unlocking this potential lies in how you introduce it to your users. That’s where product tours come in — they’re not just a feature, they are your first interaction with the user, setting the tone for their entire experience.
The success of your customers hinges on how well they can navigate and engage with your product from the get-go. This article is crafted to guide you through the nuances of creating product tours that are informative, engaging, and tailored to your audience’s needs.
By the end of this read, you’ll have a clear understanding of best practices to craft product tours that resonate with your audience. Our goal is to equip you with the knowledge and confidence to create experiences that educate and empower your users, fostering a connection with your product from the first click.
What is a product tour?
A product tour is your first chance to communicate with your users. It’s an interactive guide that introduces your digital product’s key features and functionalities. The purpose? To make users feel comfortable and confident as they navigate your platform. Think of it as a friendly, knowledgeable guide that walks new users through your digital landscape, helping them understand how to get the most out of your product from the start.
Product tours are critical in user onboarding and throughout the user journey. They’re the bridge connecting users to your product’s value proposition. A well-crafted tour not only showcases the features but also aligns them with the user’s needs and goals, ensuring they understand the immediate benefits of your platform. This understanding transforms a first-time user into a long-term, engaged learner.
Why they should be used
Users frequently face a learning curve in the digital world, especially with sophisticated software. Product tours are instrumental in smoothing this journey, perfectly balancing instructional support with user autonomy. Here are key reasons why product tours are essential:
- Streamlining user experience: A thoughtfully designed product tour simplifies the learning curve, particularly for complex enterprise SaaS products. It focuses on teaching users about the key features most relevant to their roles, making the learning process more intuitive and less daunting.
- Driving meaningful action: Beyond just showcasing features, product tours guide users to take action. This approach of ‘learning by doing’ ensures knowledge retention and helps users master your product more quickly. It’s about moving from passive observation to active participation.
- Enhancing user engagement: Well-executed product tours reduce friction in the onboarding process. A smooth initial experience with your product increases the likelihood of continued engagement, helping users recognize and appreciate your tool’s value. This is pivotal in boosting user retention rates.
- Expedited onboarding: Product tours accelerate the learning process. By guiding users through essential features and functions, they enable quicker proficiency and reduce the time it takes for users to derive value from your product.
- Reduced support requests: By providing a clear and comprehensive introduction to your product, these tours can significantly decrease the volume of support inquiries. Users are more likely to understand how to use your product effectively, encountering fewer issues requiring support.
- Fostering the ‘Aha’ moment: The ultimate goal of user onboarding is to lead users to the ‘aha moment’ — the point where they recognize the value of your product. A well-crafted product tour can hasten this realization, propelling users toward full product adoption.
They are not product demos
Product demos are like interactive presentations aimed at potential customers. They showcase a product’s features and benefits to persuade the audience toward a purchase. However, unlike product tours, demos are typically passive experiences where the audience observes rather than interacts.
If a product demo is a movie, a product tour is more like a video game. In a movie (demo), you’re an observer of what’s happening, while in a video game (product tour), you’re actively engaged and involved in the experience.
Product tours are defined by their interactive, in-app nature. They’re tools for onboarding users to a product, helping them understand and adopt its features effectively. This sets them apart from other forms of customer engagement and educational tools.
Key elements of an effective product tour
Crafting a product tour that resonates with your users involves several critical elements. Here’s an expanded look at what makes a product tour not just functional but impactful:
Personalization and contextual engagement
- Segmented approach: Tailor your product tours to different user roles, offering a personalized experience that speaks directly to each user’s unique needs and objectives.
- Action-triggered tours: Initiate tours based on specific user actions, ensuring that tutorials are contextually relevant and appear at just the right moment.
- Match UI patterns with use cases: Choose UI patterns best suited for each part of your tour. For example, use pop-up modals for welcome messages and tooltips for quick feature explanations.
- Design consistency: Ensure a seamless experience by maintaining consistency in design across all elements of your product tour.
- Conciseness and relevance: Keep your product tours brief and focused, quickly demonstrating your product’s value without overwhelming users with lengthy steps.
- Focus on the ‘why’: Go beyond instructions to explain the value behind each action, fostering deeper user engagement and adoption.
- Continuous updates: Regularly review and update your product tours based on user interaction data, optimizing the onboarding experience.
- Skip option: Allow users the flexibility to skip the tour, catering to those who prefer a more hands-on approach or are already familiar with your product.
Engagement techniques
- Interactive elements: Use features like clickable areas, animations, or quizzes to keep users engaged and promote active learning.
- Pacing: Find the right balance in the pace of your tour to maintain user interest while allowing sufficient time for information absorption.
Clarity and simplicity
- Clear and concise content: Provide straightforward, jargon-free information. Each step should clearly contribute to the user’s journey and understanding.
- Purpose-driven steps: Ensure every part of the tour serves a meaningful purpose in the broader context of user education and engagement.
Step-by-step guide to creating a product tour
Creating an engaging and effective product tour is a structured process. Let’s walk through the essential steps:
Planning your product tour
Effective planning is the foundation of a successful product tour. Here’s how to approach this phase with precision and purpose:
- Define objectives: Start with a clear vision of your goal. Are you aiming to increase feature adoption, enhance user engagement, or reduce onboarding time? Your objectives will guide every aspect of your tour.
- Identify key features: Determine the critical features and functionalities that need to be highlighted. Understand how these align with your users’ needs and contribute to the overall value of your product.
- Map the user journey: Visualize the user’s path during the tour. Consider the logical flow of information — how one step leads to another- to ensure a coherent narrative that gradually builds users’ understanding and skills.
- Sequence and structure: Decide on the order in which to present information. The sequence should feel natural and intuitive, guiding users from basic features to more complex functionalities.
- End goal visualization: Remember the ultimate goal of enabling users to effectively understand and utilize your product. Every element of the tour should contribute towards this end.
Designing for different user segments
When crafting your product tour, recognize each user’s uniqueness. Design a tour that adapts to various user segments, acknowledging their differing experience levels, interests, and usage patterns. This tailored approach is not just about inclusion but effectively connecting with every user.
- Segmentation by needs and interests: Understand that users have diverse needs and preferences. A survey reveals that 67% of customers favor self-exploration over extensive interactions with representatives. This preference highlights the importance of delivering a product tour that aligns with individual user preferences.
- Customized content for each segment: Avoid overwhelming users with generic or irrelevant information. Customize your tour by dividing your audience into distinct segments and then tailor the content to suit each group. This might involve creating different versions of your tour or using adaptive content that evolves based on user actions and feedback.
- Engagement through relevance: By providing a product tour experience specific to their needs and interests, you’re more likely to see higher levels of engagement. Tailored tours make new customers or prospects feel seen and understood, leading to better outcomes in terms of their learning, engagement, and overall satisfaction with your product.
- Continuous adaptation: Remember that user needs can evolve. Review user feedback and engagement data regularly to refine your customer segmentation strategies. This ongoing adaptation ensures that your product tour remains relevant and effective for all user segments over time.
The key to designing for different user segments while avoiding learning barriers is balancing personalization and inclusivity. By acknowledging the unique journey of each user, you create a product tour that resonates more deeply, fostering a sense of belonging and understanding. This approach enhances the user experience and reinforces your product’s perception as user-centric and adaptable to diverse needs.
Choose the right UI pattern
Selecting the most effective UI pattern for your product tour involves understanding the options available and their unique strengths. Here’s a breakdown of different UI patterns and how they can be utilized:
- Pop-ups: These can range from simple splash screen graphics to modal windows requiring user action. Pop-ups quickly engage users and explain the value of your application. They are effective for immediate engagement and conveying key information at the start of a product tour.
- Interactive walkthroughs: These provide step-by-step instructions for key workflows within your application. Users learn about processes as they actively engage with the product tour. Interactive walkthroughs are particularly useful for complex applications, simplifying training and enhancing user understanding during initial onboarding or feature rollouts.
- Hotspots (Beacons): Small icons or alerts, hotspots draw attention to specific application elements. They’re great for delivering information about feature updates or workflow changes. Hotspots enable a self-serve onboarding process, allowing users to interact with training material at their own pace.
- Tooltips: Tooltips offer a quick overview of a feature or UI element’s function. They are less intrusive than guided product walkthroughs and are excellent for providing concise, crucial information without prompting users to take action.
- Explainer videos: Integrating explainer videos with pop-up modal windows can create engaging welcome messages for new users. A video overview of key features upon first login can significantly increase the likelihood of users engaging with and understanding your product.
- Task lists: Reflecting the concept of sustained acceleration, task lists help maintain momentum and enthusiasm throughout the user’s interaction with the product. They effectively guide users through actions or learning objectives, keeping them engaged and on track.
- Progress bars: These visually indicate a user’s progress through the product tour. By showing how many steps are in the tour and how much progress has been made, progress bars offer a sense of control and achievement. They are crucial for managing user expectations and motivation throughout the tour.
When combining these UI patterns, the goal remains consistent: to engage users interactively at all stages of technology adoption. Well-designed product tours cater to a wide range of users, from tech-savvy to slower adopters, without overwhelming or frustrating them.
Crafting engaging content
The content of your product tour is where you connect with users. Make it count by focusing on these key aspects:
- Clarity and brevity: Use clear, concise language that’s easy to understand. Avoid jargon and overly technical terms that might confuse new users.
- Visual aids: Enhance your text with relevant visuals. Videos can provide an overview, screenshots can highlight key features, and infographics can simplify complex concepts.
- Interactivity: Incorporate elements like clickable areas, animations, or quizzes. This not only maintains user interest but also encourages active learning.
- Relevance: Tailor the content to reflect the users’ context and needs. Show how your product solves their specific problems or enhances their work or lifestyle.
- Supportive tone: Adopt a friendly and encouraging tone, mirroring a knowledgeable guide or mentor. This helps in building trust and makes the learning process more enjoyable.
- Consistent brand voice: Ensure the content reflects your brand’s voice and personality. Consistency in tone and style across all your communications reinforces your brand identity.
Checklist for Product Tour Design
- Define Objectives: Clearly articulate your goal with your product tour.
- Identify Key Features: Select the essential features and functionalities to highlight.
- Understand Your Audience: Gather data on your user segments to tailor the tour.
- Map the User Journey: Plan the tour flow from start to finish.
- Create Engaging Content: Develop clear, concise, and visually appealing content.
- Incorporate Interactivity: Use elements like quizzes or clickable areas to engage users.
- Test and Iterate: Pilot the tour with a small group of users and refine it based on feedback.
- Monitor Engagement: Use analytics to track how users interact with your tour.
- Optimize for Different Devices: Ensure the tour works seamlessly across all platforms.
- Update Regularly: Keep the tour current with any changes in your product.
Following this step-by-step guide and checklist will help you create a product tour that introduces users to your product and engages and educates them, setting the stage for a successful and long-lasting relationship with your platform.
Real-world examples of successful product tours
Learning from successful examples can provide invaluable insights into creating effective product tours. Let’s explore some case studies:
Case studies and analysis
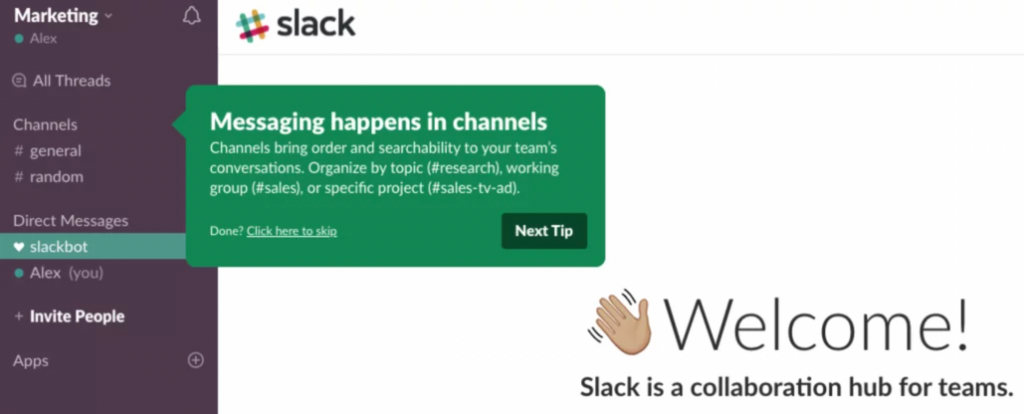
Slack
Slack’s product tour is notable for its unique blend of collaboration highlights and interactive personalization. The tour, guided by Slackbot, a friendly chatbot, asks users about their preferences and tailors the experience accordingly. This conversational approach makes the tour more engaging and helps users quickly grasp the collaborative nature of the platform and how it can enhance their work processes.
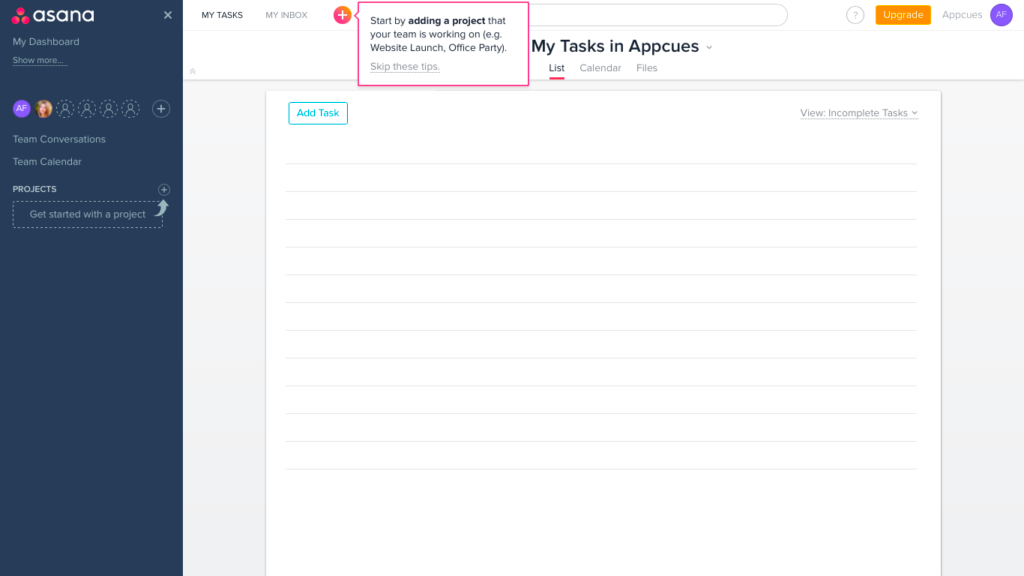
Asana
Asana greets new users with a guided setup to create their first project – a crucial step that showcases the tool’s utility. Users receive personalized app guidance post-tour, leading to their ‘aha’ moment. Asana enhances its onboarding process with contextually relevant tooltips, ensuring users feel supported throughout their journey.
Evernote
Evernote’s tour helps users kickstart their experience by guiding them to create their first note and then progressing to more advanced features. The tour includes an onboarding checklist, allowing users to complete tasks and experience a sense of achievement as they explore the tool’s functionalities.
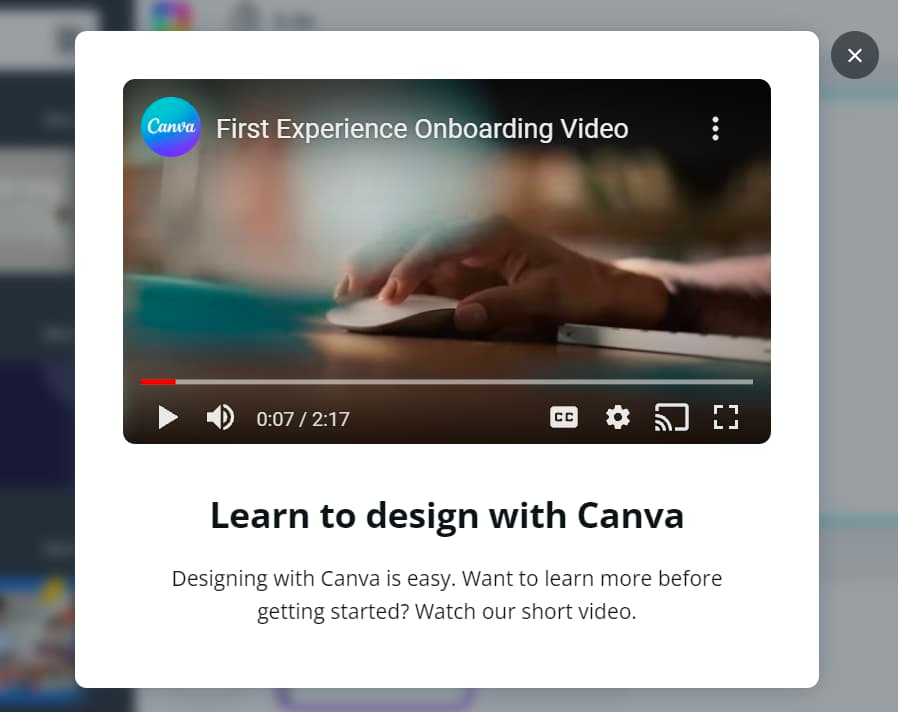
Canva
Canva begins its tour with a quick, 2-minute onboarding video, followed by a hands-on experience where users are prompted to create a design using templates. The journey concludes with a demonstration of sharing or downloading their creation, seamlessly integrating learning with doing.
Dropbox
Dropbox focuses on core functionalities, providing clear, step-by-step guidance through each feature. The tour includes practical exercises, allowing users to try out features — enhancing retention and building user confidence in navigating the platform.
What makes them stand out
These examples excel due to their strategic fusion of clarity, engagement, and personalization. They use a mix of conversational interfaces, interactive elements, and visual guides to maintain user interest. Each tour is tailored to the user’s needs and interests, facilitating a deeper understanding of the product and fostering a positive initial experience.
Measuring the success of your product tour
To ensure your product tour achieves its objectives to transform your user’s journey, you’ll need to measure its effectiveness accurately.
Key metrics to track
- Completion rate: This directly indicates how engaging and appropriately paced your tour is. High completion rates suggest that your tour is resonating well with users.
- User feedback: Direct insights from users are invaluable. They provide a qualitative measure of what’s working and areas needing improvement.
- Engagement metrics: Observing which parts of the tour users spend the most time on and which features they interact with can reveal a lot about their preferences and pain points.
- Conversion rate: Ultimately, the effectiveness of your product tour is also measured by the actions users take afterward, like signing up or making a purchase.
Tools and techniques for analysis
Here are some tools and techniques, along with insights into their unique capabilities, to help you analyze and refine your product tours:
Analytics tools
- Google Analytics/Mixpanel: These platforms offer comprehensive insights into user interactions with your tour. They provide valuable data on user behavior, tour engagement, and conversion rates, enabling you to see what’s working and what’s not.
- Pendo: Known for its deep product usage insights, Pendo helps you understand how customers interact with your product. This information is invaluable in identifying the most needed aspects of your product tours, though Pendo may have limitations in self-help content creation compared to other tools.
A/B testing
A/B testing is essential for fine-tuning your product tour. By comparing different versions, you can understand which elements resonate best with your audience.
- Whatfix: While primarily an interactive guide creation tool with an easy-to-use editor, Whatfix can be a valuable asset in setting up A/B tests, especially since it doesn’t require extensive coding knowledge.
- Appcues: This tool, focusing on product-led growth, integrates seamlessly with your product to make UI patterns appear native. However, its analytics features might not be as comprehensive as some of its competitors.
User feedback tools
- User Surveys: Conducting surveys is a direct way to gather qualitative feedback. This feedback is crucial for understanding the user’s perspective on your product tour.
- WalkMe: Though robust in features, WalkMe might require IT assistance to create content. It can be an excellent tool for gathering user feedback, especially in more complex product environments.
Heatmaps and user behavior analysis
- Hotjar: Creating heatmaps, Hotjar provides visual insights into where and how users interact with your tour, revealing user behavior patterns that might not be obvious through traditional analytics.
- Userlane: This tool is particularly suited to small and medium-sized businesses. While it may not offer the depth of customization larger enterprises might need, it’s effective for straightforward product tour analysis.
- Storylane: Ideal for engaging website visitors, Storylane allows you to create automated, code-free demos that can enhance your product’s experience. It’s a tool that facilitates engagement and product-led growth by enabling you to clone your environment quickly and provide an optimal product experience.
Each of these tools and techniques offers unique benefits. The key is choosing those that align best with your specific needs and goals, ensuring that your product tour educates, engages, and converts.
Selecting the right product tour software
When choosing a product tour tool, consider these essential features:
- No-code editor: A tool that doesn’t require coding allows you to create tours without relying on your engineering team, saving time and resources.
- Fully customizable styling: Your product tour should reflect your brand style. Look for options that offer customization in fonts, colors, button shapes, and custom CSS customization.
- Deep integrations: The best product tour software should seamlessly integrate with your existing tools, be it a CRM or analytics platform.
- Native A/B testing: Inbuilt A/B testing capabilities are vital for refining your tours based on user responses and behavior.
- Contextual targeting: Hyper-targeted tours, adapted according to user behavior and profiles, provide a more personalized and effective user experience.
- Comprehensive help documentation: Ensure the tool comes with thorough help documentation, critical for user onboarding and self-service support.
- Technical reliability: The tool should be robust and support various functionalities, such as mobile and single-page applications while ensuring it doesn’t hinder your product’s performance.
Remember, the right tool should align with your goals, balancing comprehensive features and user-friendly functionality.
Common mistakes to avoid
Creating an effective product tour is a journey marked by learning and adaptation. However, certain common pitfalls can hinder this process. At Thinkific Plus, we believe in guiding you away from these mistakes, ensuring your product tours are as effective and user-friendly as possible.
Avoiding information overload
Packaging your product tour with as much information as possible is tempting, but this often leads to user overwhelm. The key is to focus on clarity and brevity:
- Focus on essentials: Highlight your product’s most crucial features. Determine what your users need to know first to get started.
- Simplicity is key: Use clear, straightforward language. Technical jargon can be off-putting unless your audience specifically requires it.
- Digestible content: Break down information into smaller, easily digestible segments. This approach helps users absorb and retain information more effectively.
The objective is to inform your users, not to flood them with information. A well-structured tour guides users through your product effortlessly, enhancing their understanding and engagement.
Embracing user feedback
Ignoring user feedback is like sailing without a compass. User insights are crucial for the continuous improvement of your product tour:
- Active feedback collection: Use surveys, direct communication, and user testing to gather feedback. This should be an ongoing process, not a one-time event.
- Adapt and improve: Analyze feedback to understand user needs and pain points, and be prepared to make changes based on what you learn.
- Evolving with your users: Your product tour should evolve alongside your product and users. Regular updates based on user feedback ensure it stays relevant and effective.
We believe in the power of listening to and learning from users. Their insights are the key to refining your product tour and making it an integral and evolving part of the user experience.
FAQs
What are the key components of an effective product tour?
The key components include clarity and simplicity of content, engaging and interactive elements, personalization to cater to different user segments, and consistent alignment with user needs and goals.
How can I measure the success of my product tour?
Measure success through metrics like completion rates, user feedback, engagement metrics, and conversion rates. Utilize tools like analytics software, A/B testing, user surveys, and heatmaps for comprehensive analysis.
What are some common pitfalls in designing product tours?
Common pitfalls include overloading users with information, neglecting the importance of user feedback, lack of personalization, and failing to keep the content updated and relevant.
Conclusion
As we conclude our exploration of creating impactful product tours, the essential takeaways are clarity, engagement, and personalization. It’s about striking the right balance — providing enough guidance to be insightful, yet not so much that it becomes overwhelming. Continuously adapt and refine your approach based on customer feedback, ensuring your tours remain relevant and resonate with your audience.